
Baru-baru ini saya ketemu sebuah buku libre berjudul Handbook for Bloggers and Cyber-Dissidents. Isinya berkisar tentang bagaimana cara menggunakan internet dengan aman dan rahasia. Salah satunya adalah dengan menggunakan TOR alias The Onion Router. Jadi, apa itu TOR?
Kutipan dari wiki-nya TOR:
What is TOR?
Tor is an anonymity network. It protects your privacy on the internet. Tor uses a series of three proxies – computers (or nodes) which communicate on your behalf using their own identifying information – in such a way that none of them know both your identifying information and your destination. Tor can also help people get around restrictive firewalls which censor web content.
Instalasi TOR
Kedengarannya rumit ya? Tapi ternyata instalasinya cukup mudah. Apalagi bagi yang menggunakan Ubuntu sudah tidak perlu repot-report download dari situs TOR, tapi cukup dengan mengetikkan perintah:
sudo apt-get install tor
Instalasi Privoxy
Jadi begitu saja kita sudah bisa browsing anonymous? Rupanya belum. Kita masih perlu menginstall Privoxy, sebuah proxy HTTP. Alasannya?
Using privoxy is necessary because browsers leak your DNS requests when they use a SOCKS proxy directly, which is bad for your anonymity. Privoxy also removes certain dangerous headers from your web requests, and blocks obnoxious ad sites like Doubleclick.
Untuk pengguna Ubuntu, instalasi privoxy cukup dengan menggunakan perintah:
sudo apt-get install privoxy
Selanjutnya kita menyunting file /etc/privoxy/config:
gksudo gedit /etc/privoxy/config
dan menambahkan baris berikut di awal file:
forward-socks4a / 127.0.0.1:9050 .
(sertakan juga tanda titik di belakang baris)
Simpan hasil perubahan file dan restart kembali Privoxy:
sudo /etc/init.d/privoxy restart
Akhirnya, browsing anonymous dengan TOR
FireFox sebagai browser default Ubuntu ternyata direkomendasikan untuk digunakan bersama TOR dengan sedikit tambahan. Kita perlu meng-install plugin Torbutton. Selesai install, restart FireFox dan lihat di bagian kanan bawah:
![]()
Klik satu kali pada label “Tor Disabled” maka TOR untuk FireFox akan diaktifkan:
![]()
Selesai. Itu saja. Dan sekarang untuk menguji apakah kita sudah benar-benar anonymous di internet, buka URL berikut:
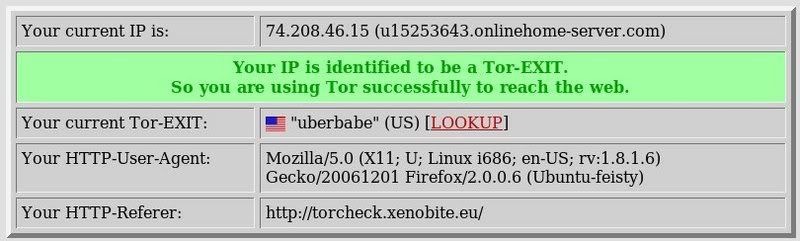
Jika muncul pesan seperti di bawah berarti TOR sudah berfungsi:
Keperluan anonymous lain-lain
Untuk menggunakan TOR dalam aplikasi internet yang mendukung proxy HTTP, cukup arahkan ke Privoxy (localhost post 8118). Untuk menggunakan SOCKS (chatting, IRC), cukup arahkan aplikasi bersangkutan ke TOR (localhost port 9050). Tapi sebelumnya perlu diingat bahwa cara ini cukup berbahaya. Untuk aplikasi yang tidak mendukung SOCKS atau HTTP, gunakan tsocks atau socat. Pengguna Ubuntu (lagi-lagi) bisa meng-install keduanya cukup dengan menggunakan perintah:
sudo apt-get install tsocks socat